7/31/12

Beautiful Wings -- Tuesday stamping


Hey there! Terri here with another stamping project....

I'm sharing a card today I made way back in March using Stampin Up's Sale-a-Bration designer series (DSP) Everyday Enchantment; since that paper is now retired, you'll need DSP that has similar colors. I was inspired by a card made by Chat M. Wszelaki.

It's a very pretty card and easy to put together. Check out my blog, stampinghare blogspot, for more beautiful cards.


Ingredients   
Very vanilla cardstock (cs) – 8.5 x 5.5” (card base), 1.75 x 5 1/8”, 3-1” squares, scraps
· Pool party (PP)Lucky Limeade (LL)Calypso Coral (CC) cs, 1” squares of each
· Calypso Coral cs 4 x 5.25”
· Everyday Elegance DSP 1.75 x 5.125”
Accessories
· Punches – postage stamp1” squarescallop border1.25" circle, and 1 3/8” circle
· Beautiful wings embosslits
· dimensionals
· rhinestone jewels
· 3/8" taffeta Crumb Cake ribbon
Crumb Cake ink


 Recipe
1.       Using Beautiful wings embosslit with the Big Shot machine, cut 1 polka dot butterfly of each PP, LL, and CC cs.
2.       Punch one postage stamp of each PP, LL, and CC.
3.       Punch one long edge of the CC cs using the scallop border punch; adhere to the front of the very vanilla card base with the scallop edge facing down.
4.       Adhere the very vanilla rectangle piece near the top of the CC piece; adhere the DSP piece just below it, leaving a very small space between the 2 pieces.
5.       Adhere a 1” square very vanilla square on each of the postage punched pieces; place a dimensional behind each and adhere to the very vanilla rectangle, spacing evenly.
6.       Place dimensionals behind each butterfly and adhere on top of each of the matching postage pieces; place a rhinestone on each butterfly.
7.       Stamp a sentiment on a scrap very vanilla piece using Crumb Cake ink and punch out a circle with the 1.25” punch; adhere to a circle of CC cs punched with the 1 3/8” circle punch.
8.       Place a dimensional behind the circles and adhere to the card front.
9.       Tie a bow and attached above the circles.


I'd love to see or hear what you have been working on! Leave me a comment telling me about your latest crafting projects. Thanks!

Stamping is fun!

Terri

Hugs and Chirps!

7/29/12

Sunday Surprise with Heather S - Vinyl on Wine Glasses

Good morning!  And what a good morning it is : )  Heather S. here with this week's Sunday Surprise and as I write this post I am sitting on an elevated deck, bayside at Ocean City, MD looking at the most amazing view.  Sigh.  Will I be able to focus though this post?  We shall see.

The project I'd like o share with you this week is my latest obsession...wine glass design.  I chose this project for two reasons:  1.  Shameless self promotion  I make these for others and would LOVE to make one for you.  Please check out my Facebook page and "like" it if you like what you see : ) 2. If you are willing to learn, I'm willing to show ya how.  Vinyl is tricky to work with and people are often scared of it, but I'll see if I can give you a few decent tricks to use to take away some of the fear.

Here are some pictures of my glasses and I'll post some tips below:


Tips:

  • First, working with matte vinyl on glass is one of the most forgiving ways to start with vinyl. If the vinyl wrinkles, its easy to pull back up and re-apply.
  • Get some cheap glasses from the dollar store.  If it doesn't work out, you won't be out a lot of money : )  Work your way up from there.  You'll also find lots of other great stuff to decorate there : )
  • USE TRANSFER PAPER.  Read the directions if you are not familiar with it.  Yes... you can use Reynolds Wrap Press and Seal.... Don't do it if its your first try.  That's a whole other tutorial in its self.  Should I do one?  Comment below.
  • Use a paper piercer to keep your fingers off the vinyl.  Carefully lift and move edges with the tip.
  • Layering is a beast.  Do it BEFORE you place it on the glass, not after and use a light table if you have one.  Its not necessary - I get by without it, but it makes things a LOT easier when you do have one.
  • EMBELLISH!!!  Add ribbon, make a wine charm, use EPOXY GLUE (not any other kind) to adhere rhinestones - get creative! (side note - I don't use rhinestones, I prefer to use mirror vinyl)
Have questions?  Please post them to my Facebook page - I'll be glad to try to answer them for you.  Happy crafting!!

PS - if you are still reading... as far as focus was concerned.... it took me over 45 minutes to write this.  LOL  Now....  back to the Beach : )  <3 Heather S


Hugs and Chirps!

7/24/12

My convention swap--a little summer fun!


Terri here with a Tuesday stamping project.


I fell in love with the idea of putting a pinwheel on a card and couldn't wait to give it a whirl so to speak! 


I used several new SU products on this card---the designer series paper used for the pinwheel along with the birthday greeting stamp and coordinating framelit die are all from the new SU annual catalog. Email me if you would like a copy (FREE with a minimum $25 order).


Speaking of fun, I had a blast at the SU convention last week in Salt Lake City---check out my blog,  www.stampinghare.blogspot.com, to see how much fun I had. Leave me a comment telling me about your favorite convention memory -- all convention stories welcome! 


I'm already making plans to attend next year, the 25th anniversary of SU; I'm sure it will be an amazing celebration!! Join my SU team now and start planning to attend with me!


Ingredients

Recipe:
  • Emboss the Real Red cs using the polka dot folder; adhere to the Daffodil Delight cs.
  • Adhere the 3" wooden skewer piece using glue dots to the card front. Slide a small piece of the red ribbon under the skewer and tie it.
  • Lightly draw a pencil line on the backside of the DSP corner making an X. Cut each line toward the center, stopping about 3/4" from the center. Erase lines.
  • With the DSP right side face up bring a corner of one cut section to the center and glue down; it doesn't matter whether it is the right or left corner piece just be consistent with the other pieces. Bring the next corner to the center and adhere; repeat until 4 corners are attached to the center.
  • Pierce a hole in the center where the corners meet; insert a glimmer brad.
  • Adhere the pinwheel to card front with a dimensional, covering the top part of the wooden skewer.
  • Stamp the happy birthday greeting in Real red ink on the scrap piece of white cs; cut it out with the coordinating framelit die. Adhere over the wooden skewer using glue dots.
Stamping is fun!

Terri

Hugs and Chirps!

7/23/12

Cricut Artiste Cartridge with Binder Project & More

Hi Krazies!

I had an awful week last week.  Thank you to the Heathers, Terri, Christie & Joanna for stepping in and helping - love you girls!

So - here is a video showcasing the new cartridge Artiste from Close to my Heart & Cricut.  Oh what fun!  The video is long but if you are in the market for cartridges on the cheap you might wanna hang in there for a super secret sale.

You can buy Cricut Artiste HERE  The cost is 99.00 however, you also get 3 D size stamp sets that go with the cartridge and are valued at 18.00 each and 3 sheets of chipboard that also go with the cartridge and stamps valued at 5.00 each.  That makes the cartridge just 30 bucks! WOOT!


Here are a few photos for you if the video is borin ya!  (I know I'm chatty.... sorry)


 The binder project. Was cut at the exact measurements the binder suggested - as you can see from the photo - the rosette dwarfed the treat box. LOL.
 Some of the cuts from Key #1.
The purse from Key #1 (3d)
 Super cute gift box I did on my own with NO instruction from Cricut - imagine that - it turned out super cute!


Here are the carts I have left - prices are 15, 20 and 25. Shipping is extra.


Still Available.  These ARE linked to a dead gypsy.  Prices
do not include shipping - Shipping by priority only and US address
only.


3 birds on parade
a childs year
accent essentials
alphalicious
ashlyns alphabet
basecamp
basketball
batman
best of pixar
beyond birthdays
birthday bash
cars
celebrate with flourish
celebrations
chore chart
christmas cards
Cutting Up
designers calendar
destinations
dinosaur tracks
disney classics
doodle type
elmo party
everyday paper dolls
fabulous finds
fancy frames
florals embellished
flower shoppe
four legged friends
freshly picked
george and basic shapes
gingerbread
give a hoot
graphically speaking
hannah montana
happy hauntings
heritage
home decor
indie art
jasmine
Jubilee
learning curve
locker talk
lovely floral
luau
lyrical letters
making the grade
meow
mini monsters
my community
my world
nursery rhymes
office help
pagoda passion
paisley
paper doll dress up
plantin school book
pooh and friends
pooh font set
pop-up neighborhood
preserves
printing 101
printing press
pumpkin carvings
rock princess
sesame street font
sesame street friends
sesame street seasons
simply sweet
slumber party
songbird
splish splash
spongebob square pants
spring holiday cards
stamping
street sign
stretch your imagination
summer in paris
superman
sweethearts
tie the knot
tinkerbell and friends
toy story
trim the tree
walk in my garden
wall decor and more
wedding
wildlife
winter lace
winter woodland
word builders word party
zooballoo


15.00 for solutions cartridges
20.00 for regular cartridges
25.00 for Disney


Hugs and Chirps!

7/22/12

Heather S's Sunday Surprise: Par-TAY time! (Angry Bird Style)

Heather S here, and I'm back with this week's Sunday Surprise!  Well,surprise!  I'm breaking my own rule already!  I said, out of the box...  I guess part of it is.  But a lot of this is definitely on paper.  And this is a long post so I'm putting my shameless plug in two places : )  I would love for you to check out my FB page at www.hsipesstudio.com  Thanks!

Today is my son's birthday party (please comment below and show him some love!!) and to say is is obsessed with Angry Birds would be the understatement of the year.  This is the first year that he is having a "real" birthday party with friends and everything, so I wanted to go all out.  I'll share some extra pics at the end showing my daughter's artwork too and her massive contribution to the party and my mom's massive efforts to making him one happy little boy : )


Oh well, first - I'll show you him - it adds a little context.  : )  my mother made all of the Angry Birds herself (and yes, she will make you one too, just contact me ;)  ) heatherhammen@hotmail.com


Amazing right?  Saved me a TON of money.

Ok on with the PART-AY!  And today's project:  A party banner and buckets for favors.  I will say  that this was a rather tedious project and it required a lot of patience and computer skill.  You've got that and this project is no problem, lol

Here are the pictures and I'll give a brief description of how they were made.  You can make the project a lot easier by doing a few things, and I'll give you some suggestions on that at the end.

Banner triangles cut at 5" made for a rather large banner - in hind sight I would like to have gone for a smaller size, but it fits very well across the cross bean in our kitchen.

The Pig.  He had the look of a pig who had been hit at least once already - so I thought the detail would be fun : ) 
Yellow Bird.  For the extras I made to sell as die cuts (because its  just as hard to make 5 as it is to make one, so I might as well) I used orange to highlight on the edge - it worked very nicely.  Also, I used brown marker to detail th.e wood, and black Stickles to look like nails.

Red bird!  (My son't favorite!)

The party bags!  Candy sleeves topped with bag toppers from Sherry K Designs, more on that below. 

Close ups  : )
OK, so here is a quick run down on how I made this fun project!  It was a LOT of work!  I used SVGs from The Lady Wolf.  Those of you familiar with her know that she took a lot of her files down, but she put them back!  You can find her Angry Bird files here: http://theladywolf.blogspot.com/2012/07/angry-birds-svg-back-by-popular-dmand.html
But even after you have them. depending on the machine you have, there is a lot of work that needs to be done to get them from that point to the cutting point - as you know if you work with SVGs found on the web for free : )

All of the birds were cut around the 3" size.  The letters were found inside of this AWESOME pack from Sherry K Designs!  FREE and if you don't feel like doing all of this detailed cut out crap, then this pack is for YOU!  Click here to download (its ok - no worries on a virus) and you get this awesome party pack AND the Angry Bird font!!  Sweet!

OK - how to make it easier?
 - Ditch drawing the wood detail on the boards.  I spent forever doing this and you can't even see it on the finished product.  
- Ditch the wood all together
- use the Sherry K pack - so cute and very easy!
- Hire me to do it all for you   (wink)  www.hsipesstudio.com

Seriously though - if you try any part of this and come into problems reach out to me, I love to help.  Happy scrapping!  - Heather

Oh!  PS - my daughter (did I mention she's only 13?!?!) made the AH-mazing cupcakes and cake for her little brother.  Isn't she awesome?!?!?!


7/21/12

Feeling RUFF card


Hi fellow crafters, it's me again, Joanna from I love 2 cut paper with a project 
using my Pazzles Inspiration.

Earlier in the week I found a cute dog graphic that I cut using my Pazzles Inspiration digital cutter.

I have used the Print and Cut technique and I can now hold up my hand and say I have mastered it....hooray!!


I made my base card using my Pazzles Studio Pro software.  I just drew a rectangle and used the scissors (tools) to make the jagged edge to the base.  I then used my crimper on the yellow paper that is adhered behind the dog.


I thought the dog looked sooooo cute and would be perfect for my friend who is not feeling great at the moment.  I simply autotraced the image, added an outline and used the print and cut technique.

I printed the sentiment using one of the fonts already installed on my computer and then cut the little tag by hand.


When you master Print and Cut with your software it allows you to make quick cards and the satisfaction of conquering another challenge with your software!

Please take a peep at my blog where there are lots of other projects using 
my digital cutting machine.


If you are quick there is a link to a couple of FREEBIE graphic files you can grab.
Available till midnight tonight MST.

7/20/12

Pinterest Flowers

 Today's project is a Pinterest inspiraton!  I have been eying this one for a while and had it on my massive to do list.  What made me go ahead and tackle it was the fact that I had two very cute paper pads that were 6x6 square.  It isn't often that I have every single thing to do it so this won hands down!

 THE SUPPLIES


While it's very easy to make the flowers, getting them to stand in a presentation suitable for who is an altogether different project.

Directions can be found here:


http://www.papervinenz.com/2011/06/map-folded-flowers-plus-tutorial.html

Thanks and I hope you try it and have fun!
~CHRISTIE

Hugs and Chirps!

7/18/12

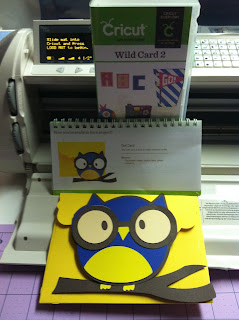
Wild Card II Binder Project

Hey Krazies!

Have you been enjoying the new format?  Thank you SO much to the Heathers (lol) Joanna (all the way from the UK) Christie and Teri for their projects! Great job ladies - can't wait to see what you come up with next.

I recently bought the new Wild Card II cartridge.  Pretty interesting and I made the binder project which was a little too easy if you ask me.

I liked that I could do a matching envelope and there are several projects I want to try out on this cartridge. I'm glad I bought it.

I also bought the brand new Close to my Heart Cricut Cartridge and it will be here next week. I will be sure to show you that one and maybe do a little video!


If you want the new Cartridge Artiste looks like it's going to be as wonderful and as popular as it's sister Art Philosophy.


You get the cartridge of course with over 700 images. There are 3d projects, a font, cupcake wrappers, party favors and invites and oh so very much more! I can not wait to get my hands on this!  If you wanna take a peak at the binder just click here.  There are also 3 EXCLUSIVE stamp sets and 3 chipboard sets. The entire package is $99.00  I realize that is a large sum but if you think about it, it really is quite the bargain. The cartridge in reality would be 30.00.  Each stamp set is 17.95 and each of the chipboard sets are 4.95.

I sure hope if you are going to purchase this set you would consider getting it from me!  You can order it direct from Close to my Heart by shopping here  which is my consultant site.  You can also click the upper right corner of my page to shop with me.

I'll see you tomorrow with another project, then Christie will be up Friday, then the Heathers and possibly Joanna again for the weekend.

Thanks everyone, your support means a lot to me!


Hugs and Chirps!

7/17/12


Terri here with today's stamping project.

Stampin' Up is giving customers who place a $50 order in July a reason to smile because they can get the exclusive Reason to Smile set set for just $5! This stamp set will not be offered for sale again.

I created this card to give to my monthly stamp club members with their orders to show them just one way this stamp set could be used. I hope you like it! Speaking of liking, please visit my blog and leave me a comment about this card.


Ingredients:
Recipe:
  1. Stamp flower image with Marina Mist ink 3 times; punch out using the 1" square punch.
  2. Punch 3 postage punches out of Marina Mist cs. Adhere flower images to the Marina Mist punches.
  3. Emboss the 2 1/4" x 5 1/2" piece of Marina Mist using the Adorning Accents embossing folder.
  4. Wrap the bakers twine around the embossed Marina Mist cs and tie a bow. Adhere to the white cardbase.
  5. Place dimensionals behind each of the flower squares and adhere to the card front.

I'll be attending the Stampin Up convention later this week. I can't wait to share all of the cool crafty stamping things I'll see while there!


Meanwhile, these are the cards I will be swapping while there...recognize the last card from last week's post?


Hugs and Chirps!

Terri Stewart

terhare@hotmail.com
Shop now!

7/15/12

Reindeer Games Bingo Christmas Card

Hi fellow crafters

This is rather new to me but I am very excited to be a Guest Designer here, this Sunday.  A little bit about me, my name is Joanna Wright......I have a Pazzles Inspiration digital die cutting machine which I LOVE!

I bought it here in the UK 2 years ago. I use it for all my cardmaking and really could not live with out it.  If you are a crafter you will understand where I am coming from!!

Anyhow, for my project today I have been busy using a FREEBIE download that is still available on my blog post (till tonight, midnight MST), so hop over and grab it!


I cut the base card on my Pazzles Inspiration and layered all the papers.  I downloaded the Bingo card which I trimmed with a guillotine and adhered to my card.  I printed the cute reindeer from a graphics set.  Using the Print and Cut technique with my cutting machine I added him to my card.  Just the addition of doodling, a purchased paper flower and some gorgeous twine my Christmas card was done!!!!

For more photos and detail, please head over to http://ilove2cutpaper.blogspot.co.uk/ and I would love you to LIKE my facebook page by clicking on the link down the sidebar on the right hand side of my blog.

It's been great popping by.

Joanna xx


Sunday Surprise with Heather S!

Hello everyone!  I am very excited to be back in the blogging world after about a year long hiatus.  A huge thank you to Kricut for pulling me out of my hidey hole.  :)   So... About me.  My name is also Heather - maybe I'll need a special alter ego like our friend Kricut.  I am the proud momma of two, a 4 year old and an about-to-be 14 year old.  I am married to my very best friend, Dennis.  I've been crafting since I was a child and scrapping for about 15 years.  I've really gotten into vinyl crafting and venturing outside of the scrappy world with my crafting over the last 5 years.  I'm guessing this is the reason why Kricut has assigned me with the Sunday Surprise segment!  (Yeah, no pressure.)   What I'll aim to do with this segment is try to show you  some of the cool non-paper crafts you can use your Cricut (or Silhouette, or Pazzles, etc)  to make.

On with today's project.  I CANNOT take credit for the idea.  You know ModPodge?  Well there is this AWESOME blog that is dedicated to all things ModPodge.  You can get to it by clicking here.  I follow her and there is always something cool being made there.  Anyway - years ago she featured an artist who made this:


I fell in LOVE and decided that it needed to be recreated in my guest room.  Here is my take on the project using leaves from Mother's Day Bouquet (though other substitutes could easily be used).  The birds were traced from a template because I really liked the shape, but since I've made it my options for birds have significantly increased with my cartridge selection : )    You can easily use any bird shape for this project.


I made it using some cute papers I had on hand from DCWV and a pair of canvases I got on sale at Michaels for a total of $4.50!!!  Such a deal!  The leaves are cut at 1.5 and 2 inches using the Mother's Day Bouquet cart (one of my favs) and I used the flip function on my Expression for half of them.  Once cut, I used Mod Podge to seal the paper to the canvas.  (****BEGINNERS TIP****  I wasn't sure if I should use Mod Podge over the whole canvas after....I'm a newbie to it and didn't know how it would dry.  I didn't and should have!)  The branches were drawn freehand with pencil, then painted over with dark brown acrylic paint.  I LOVE how these turned out - and it became the first of many Cricut + Canvas projects!  Very fun and very easy!

I hope you have enjoyed my post today!  Please check out my Facebook Page at H. Sipes Studios : )  Hope to see you there!  - Heather S  <3


Hugs and Chirps!

7/14/12

Hi Kricut Krazies!!! Its Heather Johnson with todays svg project.
Ive made a card for a friend of mine. I adored doing it.


The SVG File Cat that I used is by Melissa Deuss of Kadoodlebug.
The background papers are from the Pets stack and Fall Stack by DCWV.
I used Chalks on the face and body of the cat. The "Thanks Big Time Stamp" is from a set by Stampin Up. The sentiment inside says that "You're the Cats Meow".

 Have a great rest of the weekend!
XOXOXO! Heather

7/12/12


Hey, Kricut Krazy friends;

A while back, I was planning things for one of my best friends baby shower.  I stumbled across a thank you card that I sat aside because I knew I could duplicate it.  Well, that is what I attempted and even though it is not exact or perfect, I am in love with this little card and think it's adorable. 

I used a 4x5.5 card and covered it with sky blue card stock cut to the same measurement.  I topped it with a 3.75x4.75 yellow scalloped square followed by orange polka dotted ribbon, two scalloped circles and the duck  (the circles have pop dots to give it some depth).  I used my Cricut Mini and as usual, it did a fantastic job.  The square and circles are from the favored Cricut Cartridge Art Philosophy and the adorable duck is a freebie (one of the very few) from Cricut Craftroom Basics.  The stamp is from Closer To My Heart and it is from the Petite Perks.  I used Stickles to duplicate the bubbles.

I hope you enjoy this card as much as I did making it.  I'm going to make about 15 more for my girlfriend to send out after her baby shower.    Here is the pinterest pin of the original: http://pinterest.com/pin/5488830766630303/

 I only wish my iphone camera had a flash so this picture would do the card justice!  My apologies and when I can edit this with a shot from my real camera, I will.


 Happy Crafting;
 Christie


Hugs and Chirps!

7/11/12

Cricut Newbie Share

Hey Krazies -

While perusing my blog files I came across this notecard. I made 8 of them in 4 different colors. This was my first ever Cricut Project and I was so proud of my layering. Then I added the gems and was pleased as punch at how clever I was. Looks plain I know but I sure like it!


Here was my 2nd project which was the Bee Happy thank you cards.  A few of my early blog winners have received that one.  The frogs and purse were just playing around.

Be sure to come back tomorrow when there will be a Pinterest tried item for the day. I'm not sure what it's gonna be yet so I'll be just as surprised as you are!


Hugs and Chirps!

7/10/12

A scrappy stamped card


Terri here with today's stamping project.

I am very honored to participate on the Kricut Krazy design team!

I have been a Stampin’ Up demonstrator since October 2010. I attended my first Stampin Up (SU) workshop in 1996. Most of what I saw at that first show is long forgotten. But I still remember exactly what I purchased, though, and why. My first SU purchase was stamp for a wheel and an ink cartridge for the wheel handle that had both purple and blue inks; being the crafting packrat that I am I believe I still own both! That long ago demonstrator showed how you could easily stamp the edges of tissue paper using the stamping wheel. I bought a wheel with a pansy design because I thought of how cool my gift bags would look with tissue paper stamped with two-toned pansies. Even then I wanted to share my stamping projects!

Over the years I have become more and more enthusiastic about stamping---and now I can honestly say most of my thoughts are stamping related. I have so much fun stamping and sharing my creations that I want everyone to have the same fun! Check out my Stampinghare blog to see more of my stamping projects.

I made the birthday card below as a sample for class I recently taught; I'm sharing the ingredients and recipe with you today. I'm calling it a scrappy card because it uses many scrap pieces of cardstock. I hope you like it! Please contact me if you have any questions. This card uses tone-on-tone white cardstock embossed with SU’s vintage wallpaper embossing folder and a splash of Melon Mambo color.


Ingredients:
Cardstock:
Whisper White 8.5 x 5.5 ", 4.75 x 3.3.75" scraps for flower, 1" circle, word window punch
Melon Mambo 4.25x .75", scrap for modern label punch

Recipe:
  1. Emboss the 4.75 x 3.375" white cs with the vintage wallpaper embossing folder. Cut it into 3 pieces, each 4 3/4" by 3 1/8"; to keep the order correct on the back of each, mark the pieces 1, 2, and 3. Round the corners on each piece.
  2. Attach the pieces to the white cs base in 1, 2, 3 order, centering top and bottom with about 1/16" between the pieces. 
  3. Using the ribbon lace border punch punch the 4.25x .75" piece of melon mambo cs. Attach to the card base. 
  4. Stamp a flower from mixed bunch set with melon mambo ink on a scrap piece of white cardstock (cs); punch out using the blossom punch. Using a bone folder curl the petals back.
  5. Stamp a flower center from Mixed Bunch stamp set with daffodil delight ink on another piece of whisper white cs; punch out with 1" circle punch. Attach with a dimensional to the center of the flower punched out above then attach to the card base with another dimensional.
  6. Stamp happy birthday from the Easy Events set in melon mambo ink on a scrap piece of whisper white cs; punch out just the birthday greeting using the word window punch.
  7. Punch a modern label using a scrap piece of melon mambo cs. Attach the happy birthday word window punch on top of the modern label punch. Attach to the card base with dimensionals.

Stamping is fun!

Terri Stewart

Check out my blog or shop my Stampin Up online store
contact me at terhare@hotmail.com


Hugs and Chirps!
7/9/12

Straight from the Nest Binder Project Rewind!

Hey Krazies!

This is one of my first binder projects from a year or two ago.  I love this one!


Here is the binder project from Straight from the Nest - it's cute as can be!  A window card? Shutter card? I don't know what it's called but I love it and hope you do too!


Hugs and Chirps!

7/8/12

Joyful July!

Hey Krazies -

Fun schedule coming up for the rest of July. Give me a break, we had a holiday last week :)  I had 40 some people in my yard and the threat of thunderstorms and oh did I mention it was 280 degrees? Lordy Lordy! Or that we had a wicked wicked storm last Friday that knocked out power for DAYS?  Yeah.... This was me last week:


Ok so here is what's coming!


Mondays:  Cricut Binder Project
Tuesdays:  Stamp Project
Wednesdays:  Cricut Binder Project
Thursday:  Pinterest Project
Friday:  Cricut Binder Project
Saturday: Other Cutter Project (Pazzles, Cameo, ecraft, etc)
Sunday:  Surprise Sunday - anything goes!


I will be handling Monday, Wednesday and Friday this week. I have new guest designers that will handle the other projects so please give a warm welcome to Heather J, Heather S, Christie (my evil twin) and Terri who is an awesome demonstrator from Stamping UP (and I've been taking my classes from lately)

Be sure to show them some love but clearly I should get more then they do cause well....... I need it more  

While you are waiting for the new Kricut Krazy to kick off, please be sure to check out this SUPER crazy lady who has taken it upon herself to test out stuff from Pinterest and has plenty of photos and commentary to go along with it.  www.pintester.com  I think it's my new favorite blog!

See you tomorrow!


Hugs and Chirps!

7/6/12

July update

Hello my Krazies -

Exciting things happenin around here.  Course we started off July with a holiday so that put everything behind and then I'm trying to sell all my cricut cartridges (no worries I'll keep up the blog and Cricut projects) and assemble the Design Team members. Once all our ducks are in a row we'll be sure to keep you entertained and informed on a regular basis!

In the meantime - here are the cartridges still available.  Please contact me if you are interested in any of them. Please keep and mind these are connected to a Dead Gypsy.  Prices are final and do not include shipping.  I prefer to just ship in the US but will consider shipping out of the country - of course the buyer would be responsible for shipping.


$15.00
April Showers
Basketball
Christmas Cards
fathers day
gingerbread
happy graduation
independence day
indie art
$20.00
A childs Year
All Mixed Up
All Sports
Alphalicious
Animal Kingdom
Ashlyns Alphabet
beyond birthdays
billionaire
birthday bash
block party
calligraphy collection
carousel
Celebrate with Florish
Celebrations
Chore Chart
Christmas Cheer
Designers Calender
Destination
Dinosaur tracks
doodle type
everyday paper dolls
favulous finds
fancy frames
florals embellished
forever young
four legged friends
freshly picked
george and basic shapes
give a hoot
going places
graphically speaking
handy man
hanna montana
happy hauntings
heritage
home décor
hoot and holler
jasmine
learning curve
lifes a beach
lifes a party
locker talk
lovely floral
luau
lyrical letters
making the grade
meow
mickey and friends
mini monograms
mini monsters
my community
my world
nifty fifties
nursery rhymes
office help
old west
pagoda passion
paisley
paper doll dress up
picturesque
plantin school book
preserves
printing 101
printing press
pumpkin carvings
rock princess rock princess rock princess
sans serif sans serif sans serif
simply sweet
slumber party
snow friends
songbird
speaking of winter
splish splash
sports mania
spring holiday cards
stamping
stand and salute
straight from the next
street sign
stretch your imagination
summer in paris
summer vacation
sweet tooth boxes
sweet treats
sweethearts
thanksgiving
tie the knot
trim the tree
very merry tags
walk in my garden
wall decor and more
wedding
wildlife
winter lace
winter woodland
word builders word party
word builders garden of words
word collage
zooballoo
$25.00
3 birds on parade
Accent Essentials
batman
best of pixar
Cars
disney classics
dreams come true
elmo party
everyday cricut
mickey and friends
once upon a princess
pooh and friends
pooh font set
pop-up neighborhood
sesame street font
sesame street friends
sesame street seasons
Spongebob
Superman
Tinkerbell
Toy Story


Hugs and Chirps!

Backpack and T-shirt’s

Back when Ragan was starting preschool, she wanted a Hello Kitty Backpack. The only one I could find was way out of our price range. So, I m...